In this guide, we’re going to introduce you to the AAWP’s main functions and show you how to use them on your site.
Basics #
To get an overview of AAWP, you can also watch our walkthrough video:
Using shortcodes #
By way of example, we’ll show you how to use a shortcode and insert it into your posts (or pages).
Step 1: Get your shortcode #
Navigate to our shortcodes overview page.
Right under the heading “Basic Shortcodes” you are going to find an overview of the plugin’s main functions. Copy the shortcode you want to use, by clicking on the blue button on the right side.

Step 2: Select a post/page #
Inside your WordPress’ admin area, navigate to the post/page where you want to place the shortcode. To do so, click onto the entry “Posts” (or “Pages”) of the main navigation. On the overview page, please select the entry you want to edit.

Step 3: Insert shortcode #
Now place your cursor at the place where you want to insert the shortcode, simply make a click on the right and select “paste”. Alternatively you can use the keyboard command STRG + V.

Step 4: Find your article number (ASIN) #
Next you have to enter/replace the ASIN inside the shortcode. For doing so, you’ll need the ASIN of the Amazon product you want to link. You will find the ASIN on in the product information section of the product itself.
In order to copy the ASIN, mark it with the cursor and make a click on the right and select “copy”. Alternatively you can use the keyboard command STRG + C.

In case there is no ASIN written down, you can also find it in the URL of the product (see “Find out article numbers” )
Step 5: Insert your ASIN #
Next you have to go back to your WordPress admin area and insert the new ASIN into the shortcode. Simply replace the existing ASIN inside the quotation marks.

Now hit the “preview” button on the top right of the page and take a look at the output on the frontend.
Note: All shortcodes can be placed inside the WordPress editor as well as in text widgets.
Usage of the main functions #
1. Textlinks #
What is an Textlink? #
A Textlinks is nothing else than a simple HTML-hyperlink, which leads to an Amazon product and includes your affiliate id.
By default for the link name the product title will be taken. You can also modify the title on a shortcode basis.
All links coming from AAWP will be opened in a new tab or window and marked as “nofollow”.
How does the shortcode look? #
The basic shortcode for a textlink looks like this:
[amazon link="B01DFKBG54" /]If you want to use your own title, you can do so by adjusting it like this:
[amazon link="B01DFKBG54" title="Mein Produkttitel" /]How does the output look on the website? #
Standard shortcode:

With user-defined title:

More details about the textlink shortcode and its adjustments can be found here.
2. Product Boxes #
What is a product box? #
A product box displays all product information within an elegant and conversion optimized box. Basically a box includes the name of the product as well as the price and a short description. Furthermore a buy now button is shown on the bottom right side.
Additionally you can show the Amazon Prime icon (optional) in order to generate more commissions. This icon shows up if the product is marked as “available for Prime”. In order to activate this functionality, go to the plugin settings page, tab “output” and scroll down to the “pricing” section. Besides the title “Prime” you can find a dropdown field.
How does the shortcode look? #
The basic shortcode for a product box looks like this:
[amazon box="B01DFKBG54" /]How does it look on the website? #

More details about the box shortcode and its adjustments can be found here.
3. Bestseller List #
What is a bestseller list? #
This is a list of the most sold products inside a specific category. By default the plugin generates a list including 10 products. You can adjust the number of products in order to create a top 5 list for example.
Bestseller lists are based on given keywords, not ASINs.
How does the shortcode look like? #
The basic shortcode for a bestseller list looks like this:
[amazon bestseller="wordpress bücher" items="3"]How does it look on the website? #

More details about the bestseller shortcode and its adjustments can be found here.
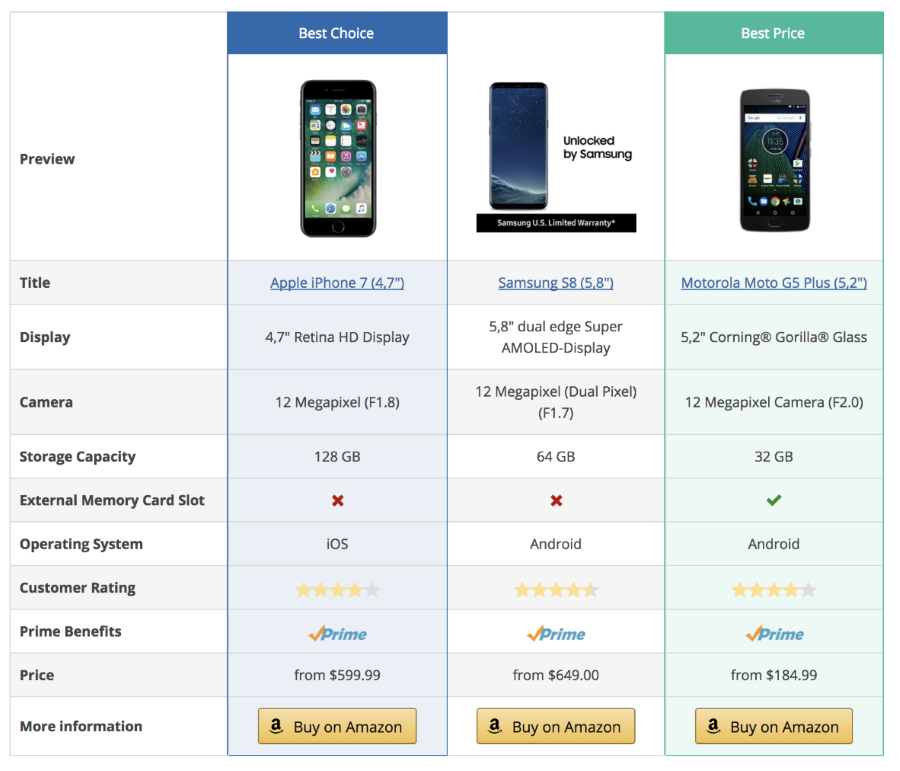
4. Comparison tables #
What is a comparison table #
Comparison tables are a very handy way to compare multiple products and support your website visitors with their buying decision.
You can choose the number of products that are shown in the table. In general we recommend comparing 3 to 5 products. Showing too many products may confuse your visitors due to the large amount of information inside a single table. This leads into leaving visitors without making a purchase.
The aim of a comparison table should always be, to make the buying decision for the visitor more clear. If this is the case, you are offering your customers an easement and they are going to be thankful and buy over your affiliate-link.
How to create a comparison table? #
Here you can find a video tutorial which shows you how to setup a comparison table.
How does the shortcode look? #
You can find the shortcode of your previously created table right above the “save” button. Copy the shortcode into your clipboard and simply insert it into the post (or page) you like.
[amazon table="2628"]The number in the shortcode represents the table, you created.
How does it look on the website? #
More details about the comparison tables and its adjustments can be found here.
5. Data fields #
What is a data field? #
A data field can be used to display single information about a product. This can be the title, price or image of the product. Our fields work very well when using them in order to enhance your existing content with single product information.
How does the shortcode look like? #
Here is an example which shows the product image in its full size including the alt attribute (for SEO purpose):
[amazon fields="B01DFKBG54" value="thumb" image_size="large" image_alt="Amazon Echo Dot"]Here is an example to display the buy button:
[amazon fields="B01DFKBG54" value="button"]How does it look on the website? #

6. Widgets #
What is an AAWP-Widget? #
You already know widgets from WordPress itself. They allow you to place content inside
the sidebar or footer of your website. Widgets can also be used in combination with Page Builders (e.g. SiteOrigin or Thrive). Right now the following widgets are available:
• Product box
• Bestseller list
• New Releases list
Each widget can be used multiple times and configured (title, design and template) individually.
Where can I find AAWP-Widgets? #
You can find our widgets in the widget area of WordPress. To get there click on Design > Widgets on the left navigation bar:

How do I include a widget in my site? #
There are two ways of including a widget into your sidebar:
Option 1
Drag the widget on the left side, move it on to the sidebar and drop it onto the desired place.
Option 2
Click onto the widget. A menu will show up and choose the entry “Sidebar” (or similar). Afterwards simply click on the blue button “Add Widget”.

Note: In order to generate a list of newly released products you to pass a browse node id. More information can be found here.
How does it look on the website? #


